 Save
Save My panini press sat unused for months until a friend showed up hungry and skeptical that a sandwich could actually be "gourmet." Twenty minutes later, we pulled out a golden, crispy creation with melted cheese oozing at the edges, and everything changed. That first bite—the contrast of crunch and soft filling—made me realize this humble kitchen gadget was about to become my secret weapon for impressing people without breaking a sweat. Since then, I've pressed everything from classic combinations to wild flavor experiments, each one a tiny edible adventure.
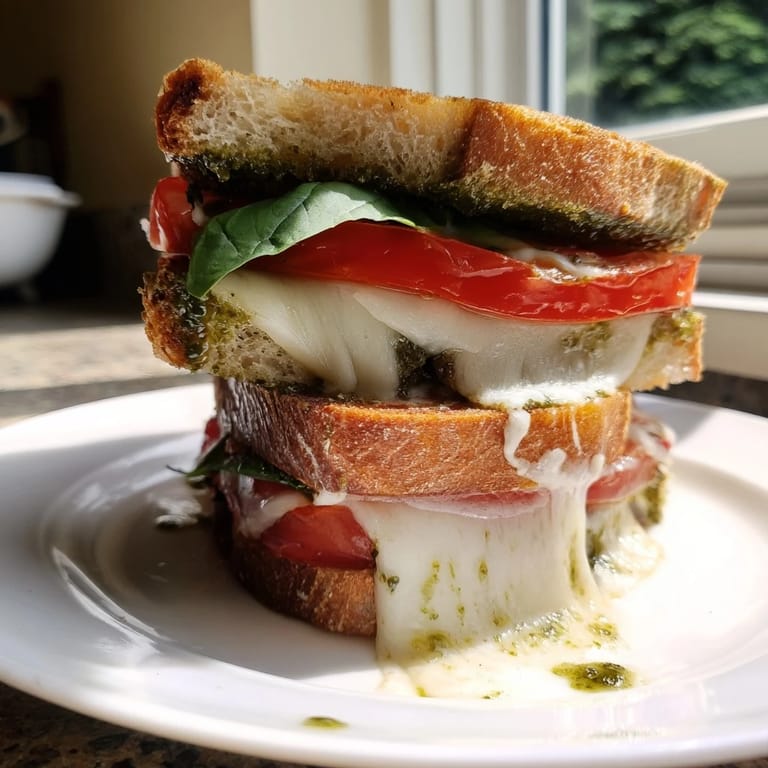
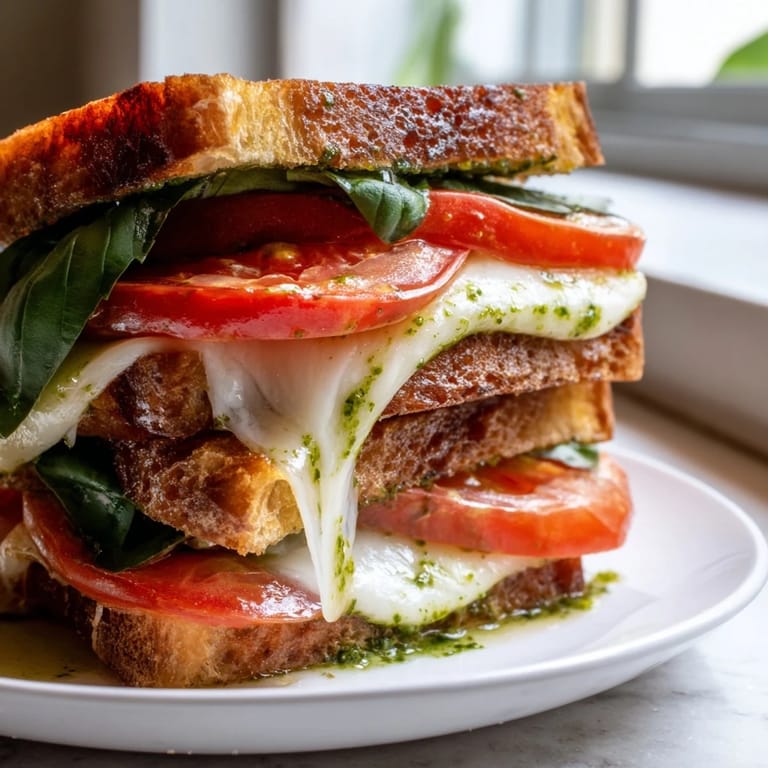
I made the Caprese version for my roommate on a lazy Sunday afternoon, and she literally sat at the kitchen counter watching the press work like it was some kind of magic trick. When I handed her that warm, fragrant sandwich with basil practically perfuming the air, she stopped talking mid-sentence. That's when I knew panini weren't just lunch—they were moments that made people slow down and actually taste their food.
Ingredients
- Sourdough or ciabatta bread (for Caprese): These sturdy, airy loaves hold up beautifully to the press without getting squished into sadness, and they have enough character to stand up to bold flavors.
- Basil pesto: Fresh or store-bought works, but if you make it yourself, the kitchen smells like an Italian grandmother's dream.
- Fresh mozzarella: Slice it thickly so it actually melts into creamy pockets rather than disappearing entirely.
- Tomatoes: Choose ones that smell sweet; mealy tomatoes will make you regret your choices.
- Multigrain bread (for Turkey & Cranberry): The nuttiness complements tart cranberry sauce in ways white bread simply cannot.
- Cranberry sauce: A small spoonful goes a long way—resist the urge to over-stuff or it becomes a wet mess.
- Swiss cheese: Mild enough not to overpower, but with enough flavor to matter.
- Focaccia or rustic bread (for Mediterranean): The olive oil in focaccia is already doing half the work for you.
- Grilled eggplant and zucchini: Pre-grilling prevents the panini from becoming a soggy, watery situation inside.
- Roasted red peppers: Jarred ones are perfectly fine and save you an entire step.
- Feta cheese: Crumbles beautifully and adds a salty tang that makes everything taste more intentional.
- Hummus: Acts as both flavoring and moisture control, which is genius engineering on the part of whoever invented this combination.
- Sourdough or country bread (for BBQ Chicken): Hearty enough to handle the weight of toppings without collapsing.
- Shredded chicken breast: Cooked and cooled so the heat comes from the press, not the filling.
- BBQ sauce: A quality version makes all the difference; the cheap stuff tastes like vinegar pretending to be food.
- Pepper jack cheese: Brings actual heat and personality to an otherwise straightforward sandwich.
- Red onion: Raw, thin-sliced, and slightly peppery—it cuts through rich fillings like a tiny flavor alarm.
- Olive oil or butter: Brush this on the outside for that coveted golden crust that sounds like you're biting into something expensive.
Tired of Takeout? 🥡
Get 10 meals you can make faster than delivery arrives. Seriously.
One email. No spam. Unsubscribe anytime.
Instructions
- Fire up the press:
- Plug in your panini maker and let it heat fully according to its manual—this usually takes 5 minutes and you'll know it's ready when it stops hissing or the indicator light settles. Preheating is non-negotiable; a cold press just steams bread instead of crisping it.
- Lay out your canvas:
- Place two bread slices on a clean surface, and take a moment to admire them like you're about to paint a masterpiece. This is your chance to make sure the bread isn't torn or weird before you commit to the filling.
- Spread with intention:
- Paint your chosen sauce on the inside of both bread slices using the back of a spoon or knife, covering most of the surface but leaving a tiny margin at the edges. Uneven spreading leads to bites that are sauce-heavy or disappointingly bare.
- Layer like you mean it:
- Start with cheese on one side (it acts as a heat conductor), then add proteins and vegetables in a logical order, finishing with greens or fresh herbs on the other side so they don't get completely obliterated. Distribute everything evenly so each bite has a little of everything and nothing slides out the sides.
- Seal and brush:
- Close the sandwich gently and use a pastry brush or your fingers to coat the outside of the bread lightly with olive oil or butter, making sure both sides get some love. This is what transforms your sandwich into something that looks intentional and tastes like it came from somewhere fancy.
- Press with confidence:
- Place the sandwich in the center of your panini press and close the lid without slamming it like you're angry at bread. Let it sit undisturbed for 4 to 6 minutes while you listen to it sizzle and watch for golden brown spots peeking out the sides.
- The moment of truth:
- Lift the lid slowly—the aroma will hit you first, then you'll see the crispy, golden exterior and feel the heat radiating off it. Use a spatula to gently slide it out, slice it diagonally if you're feeling fancy, and serve immediately while it's still warm enough to melt anything that's left to melt.
 Save
Save There's something almost ceremonial about that moment when you place a completed sandwich into a hot press and close the lid, trusting that chemistry and heat will do the work. I watched a five-year-old press her first panini once, and the look of wonder on her face when she saw it emerge golden and intact was worth more than any five-star review.
The Four Flavor Worlds
Each combination exists in its own flavor universe, and choosing one depends entirely on your mood. The Caprese tastes like summer even in January, with fresh basil and tomato reminding you that bright things exist. The Turkey & Cranberry feels like a holiday without needing an occasion, sweet and savory playing against each other like old friends. Mediterranean Veggie is what happens when you want something warm and substantial but don't need meat to feel satisfied. The Spicy BBQ Chicken is for when you want unapologetic flavor—it walks into a room and demands attention, and you're grateful for every crispy, smoky bite.
Customization Without Overthinking
The beauty of panini is that they're endlessly flexible, which means you can build exactly what your refrigerator is screaming at you to use before it wilts. I've pressed sandwiches with leftover roasted vegetables, caramelized onions that took three hours but tasted like liquid gold, pickled jalapeños for unexpected heat, and even soft cheeses that shouldn't technically work but somehow do. The only real rule is that your flavors should complement each other, and your bread should be sturdy enough not to fall apart—everything else is just improvisation with excellent results.
Serving and Pairing Wisdom
A panini never stands alone quite as well as it does alongside something cool, acidic, or broth-based that balances the richness of pressed bread and melted cheese. A crisp salad with vinaigrette cuts through everything beautifully, or a light soup transforms a sandwich into something that feels like an actual meal rather than just hunger management. The wine pairing note wasn't a joke—these sandwiches genuinely do pair with beverages in interesting ways, and taking two minutes to set up your side options makes the whole experience feel intentional rather than rushed.
- Serve panini immediately while they're still radiating heat; they become exponentially less appealing once they cool down and the bread hardens.
- If you're making multiple panini, keep the finished ones wrapped loosely in foil in a warm spot while you press the others so everything stays hot.
- Slice diagonally—it looks better and somehow tastes better too, which might be psychology but who cares.
 Save
Save Panini press sandwiches are one of those rare kitchen creations that feel impressive but require almost no skill, which means you can feed people well without stressing yourself into a corner. Master these combinations and you've got a whole language of quick, delicious meals that will make you feel capable.
Recipe Questions & Answers
- → What type of bread works best for panini sandwiches?
Choose sturdy breads like sourdough, ciabatta, focaccia, or multigrain varieties. These breads hold up well to pressing and grilling without falling apart. Avoid soft breads that compress too easily and lose their texture when pressed.
- → How long should I cook each panini in the press?
Cook for 4-6 minutes depending on your press temperature and desired crispness. The bread should turn golden brown and crispy while the cheese melts and fillings heat through. Check after 4 minutes to prevent over-browning.
- → Can I prepare panini fillings in advance?
Yes, you can slice vegetables and prepare components ahead of time. Store them separately in airtight containers in the refrigerator. Assemble sandwiches just before pressing to maintain freshness and prevent sogginess.
- → What are good vegetarian panini options?
The Mediterranean Veggie combination is naturally vegetarian with grilled eggplant, zucchini, roasted red pepper, feta, and hummus. You can also create variations using fresh vegetables, different cheeses, pesto, or plant-based spreads on any bread base.
- → How should I brush the bread before pressing?
Lightly brush the outer surfaces with olive oil or spread with butter. This creates a golden, crispy exterior and helps the bread press evenly. Avoid over-oiling, which can make the sandwich greasy or cause it to slip in the press.
- → What's the best way to serve pressed sandwiches?
Serve immediately while still warm for optimal texture and melted cheese. Slice diagonally if desired. Pair with complementary sides like fresh salads, soups, or beverages such as crisp white wine or light reds to enhance the meal.